Monday, January 31, 2011
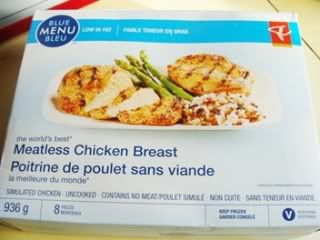
IN WHICH I TRY GARDEIN'S "MEATLESS CHICKEN BREASTS" WITH A PERUVIAN-INSPIRED SAUCE


As you probably know, I haven't had alot of time or inclination for cooking lately, with my dear Mom's illness, hosting family members, and Mom's subsequent death and all that goes with that. So, we were eating store bought vegan foods more often. I saw Gardein's vegan "Meatless Chicken Breasts" (packaged for the President's Choice Blue Menu brand [Canadian], 8 in a box with no sauce-- Tal Ronnen
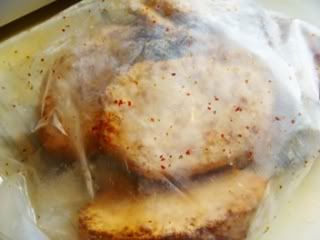 They have a rather alarmingly real look and texture!
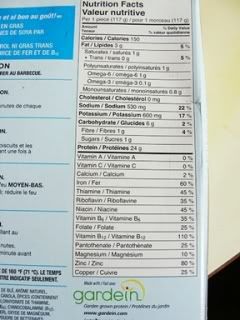 Only 150 calories and 3 g fat per piece
I've mostly used them in an Italian manner, with a light sauce of wine or fresh lemon juice, olive oil, broth, mushrooms and herbs. We have enjoyed them that way. They have a really chicken-like texture, but not alot of flavor. In my opinion, they need a good sauce!
The other night I had to make something quickly, and as I've been reading alot about Peruvian cooking and other South American cooking, I recalled a well-known (and delicious) potato recipe called Papas ala Huancaina (or Huancaya). I thought that the sauce would be a good foil for the Gardein product, since it is both creamy and spicy. Unfortunately, it can be very high in fat (some recipes calling for 1 cup of oil, on top of cheese and evaporated milk!). So, I made quite a few substitutions. (That's why I'm calling it "Huancaina-Inspired".) When I have time, I'm going to work on a version that is a little closer to the original, but still not so high in fat.
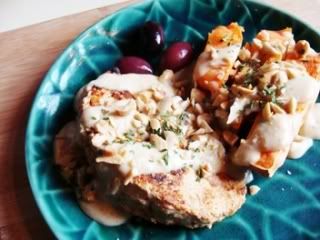
It is quite delicious, and I thought it was super-yummy on the Gardein "chicken breasts" with the addition of a sprinkling of chopped roasted peanuts. I served it simply with salad and a sweet potato, but rice and/or steamed yellow potatoes would be more traditional (rice is ubiquitous with most Peruvian meals). Oh, and just follow the directions on the package for stove-top cooking. It takes about 10 minutes.
Papas a la Huancaina (or Huancayo) are served like this: On each serving plate, place a lettuce leaf. Place a steamed Yukon Gold potato (still hot) on each lettuce leaf. Place 3 black (kalamata or Alfonso) olives, 2 chunks of cooked sweet potato, 2 chunks of cooked corn on the cob, and 2 or 3 chunks of Potted Tofu (or commercial "Tofu Feta") around the potato. Coat the potatoes with the sauce, distributing evenly. Garnish with strips of pepper and chopped roasted peanuts. Serve immediately.
BRYANNA’S VEGAN, LOW-FAT HUANCAINA (OR HUANCAYA)-INSPIRED SAUCE
Yield: 2 cups
This may be a bit thinner than the traditional sauce-- I don't like my sauces too thick.
This may be a bit thinner than the traditional sauce-- I don't like my sauces too thick.
1 cup nondairy milk
1/2 cup extra-firm SILKEN tofu OR regular medium-firm tofu, crumbled
1/2 cup water
3 tablespoons unbleached flour
2 tablespoons nutritional yeast flakes
1 teaspoon vegetarian broth powder , or paste
1/2 teaspoon salt
1 to 3 teaspoons ají amarillo paste
 (Peruvian hot yellow pepper sauce) (NOTE: if you cannot get ají amarillo paste, use Sriracha hot sauce instead)
OPTIONAL: a little (about 1/2 teaspoon) turmeric to make the sauce more yellow-- the ají amarillo will make the sauce yellow, but, if you don't like it spicy, you might not use enough to make it yellow. As you can see from my photo, I didn't use turmeric.
Additions:
Additions:
1/2 a medium onion, minced finely and sautéed until soft in a little olive oil
the juice of approximately 1/2 a lemon (or to taste)
the juice of approximately 1/2 a lemon (or to taste)
freshly ground black pepper to taste
Place all of the ingredients, except the pepper, in the blender and blend until VERY smooth. Pour the mixture into in a heavy medium saucepan. Stir over medium-high heat until it thickens and boils, then turn down and simmer on low for a few minutes.
MICROWAVE OPTION (this is what I usually do): In a large microwave-safe bowl or 1-2 qt. Pyrex measuring beaker/batter bowl , cook the blended ingredients on full power for 1 1/2 minutes. Whisk
 . Microwave for 1 1/2 more minutes. Whisk. Microwave for 1 1/2 minutes more.
Either way, stir in the sautéed onion, lemon juice and pepper to taste, and serve hot.
Enjoy!

Thursday, January 27, 2011
LOWER-FAT PURPLE SKORDALIA (GREEK POTATO AND GARLIC DIP) WITH GIGANTE BEANS

I have some purple potatoes that need to be used. A friend purchased them for me in the fall at a farmers' market in Vancouver -- organic ones at $3 lb! I was saving them for a Peruvian recipe (that's coming!), but today I decided to pretty-up a delicious potato-based Greek dip (or spread) called Skordalia by using them instead of the usual white ones. I also wanted to lower the fat in the recipe (the traditional recipes contain LOTS of olive oil), which I did by using my low-fat homemade vegan mayonnaise (you can also use Reduced Fat Vegenaise®, if you prefer). The result is a creamy, deliciously garlicky dip that is very simple to make.
This dip is traditionally served with fried fish, but is delicious with fried tempeh or tofu strips, or raw or steamed vegetables (green beans would be yummy!). We like it with cooked gigante beans

This combination makes a hearty snack or lunch.
BTW, anthocyanin pigments, which are responsible for red, purple and blue vegetables and fruits, give these potatoes their unusual color and have nutritional value as antioxidants. Consequently, blue/purple potatoes have higher levels of antioxidants than ordinary potatoes.
Are purple and blue potatoes different varieties? Yes and no-- read this article!

BRYANNA'S PURPLE SKORDALIA (GREEK POTATO AND GARLIC DIP OR
SPREAD), LOWER FAT!
Servings: 6 (1/2-cup)
Yield: 3 cups
Purple (or blue) potatoes make this delicious dip even more
special and certainly prettier! TIP: Purple or blue potatoes react best to
steaming, rather than boiling
1 lb. purple or blue potatoes
6 large cloves garlic, crushed
1 cup Bryanna's Lowfat Veggienaisse or commercial reduced-fat mayo
1/2 medium lemon, juiced
1/2 teaspoon salt
chopped or dried parsley for garnish
Wash the potatoes and cut into even-sized halves or chunks.
Do not peel! Steam them over simmering water until fork-tender, but not mushy.
Peel each chunk under cold running water-- the skins should slip of easily.
In a large bowl, mash the potatoes well with a potato masher
(or use a potato ricer). Add the crushed garlic and the vegan mayonnaise. Mash
again, and then switch to a heavy wooden spoon and beat in the lemon juice and
salt.
Smooth the mixture into a shallow serving bowl and spray
with olive oil from a pump sprayer. Sprinkle with fresh chopped or dried
parsley. Serve at room temperature (if
refrigerated, let it sit at room temperature for about an hour before serving
Nutrition Facts:
Nutrition (per 1/2 cup): 131.9 calories; 33% calories from
fat; 5.0g total fat; 0.0mg cholesterol; 407.9mg sodium; 334.9mg potassium;
20.1g carbohydrates; 1.7g fiber; 0.9g sugar; 18.3g net carbs; 2.6g protein; 2.7
points.
If you use Reduced-Fat Vegenaise®, the fat and calorie
content will be higher, as follows per 1/2 cup: 191.5 calories; 57% calories
from fat; 13.4g total fat; 0.0mg cholesterol; 400.3mg sodium; 304.7mg
potassium; 19.3g carbohydrates; 1.4g fiber; 0.8g sugar; 17.9g net carbs; 1.6g
protein; 4.7 points.
Enjoy!

Friday, January 21, 2011
NEW NO-KNEAD VERSION OF MY MOIST 100% WHOLE WHEAT SANDWICH BREAD (FLAX SEED OPTIONAL)

I haven't been cooking much beyond soup, veggie sausages, and pasta these days, due to our situation, but earlier this week I decided to experiment with converting my 100% whole wheat sandwich bread to the no-knead technique, to make it easier and more flexible for busy home bakers. Not everyone wants the crusty bread that the no-knead technique is so great for-- sometimes you want a softer bread, or sometimes you don't want to bother with baking on hot baking stones or in hot pots!

I tried it one time with too much water in it and it was tasty, but too heavy. So, the other day, I cut back on the water and it was just great! If you prefer 100% whole wheat, but you want a less crusty, softer version, I think you'll enjoy this simple bread for toast and sandwiches. We mill our own flour with the wonderful WonderMill, BTW!

Printable Recipe
BRYANNA'S NO-KNEAD BASIC TENDER 100% WHOLEWHEAT BREAD
Yield: 2 loaves
Yield: 2 loaves
(You can double this recipe to make 4 loaves, but DO NOT double the yeast! If you halve the recipe to make only one loaf, use only 1 teaspoon of dry active baking yeast or 3/4 teaspoon instant yeast)
IMPORTANT NOTE! Before making this recipe, get an inexpensive oven thermometer and test the heat of your oven. Many ovens are as much as 100° off, even new ones! If it is seriously off, have it calibrated by someone from a company that sells and fixes stoves and ovens. Otherwise, you may have to adjust the temperature up or down when you bake.
3 1/2 cups very warm potato cooking water
OR use warm water water plus 1/4 cup instant potato flakes
1 Tbs sweetener of choice (I use organic sugar )
)
1 1/2 tsp. (1/2 Tbs.) dry active baking yeast (please DO NOT increase this amount!) OR 1 tsp. instant yeast
1/4 cup ground flax (optional) (use golden flax , if you like)
1 Tbs sea salt (please DO NOT reduce this amount or leave out-- salt is important to regulate rising, as well as for taste)
2 Tbs oil (I use olive)
7 cups whole wheat flour (Canadian all-purpose whole wheat flour has a higher gluten content than US; use bread flour in the US; use hard white whole wheat flour
 if you like) (If you grind your own, 4 1/2 cups hard wheat kernels [red
 or white
 varieties] will mill into just about this amount of flour)
OPTIONAL: raw sesame seeds to sprinkle on the bottom of the pan
NOTE: Why use potato water? Well, for one thing, it's a good use of water from cooking potatoes. But, seriously, the potato seems to help make 100% whole wheat bread nice and light-- I'm not sure why.
TO MAKE THE BREAD:
Dissolve the yeast in the potato water or water with potato flakes, along with the sweetener in a large bowl. When bubbly, mix with the remaining ingredients and then stir in the flour, using a Danish dough whisk or a heavy wooden spoon. The dough will be soft and rough looking-- don't worry!
IMPORTANT NOTE! Before making this recipe, get an inexpensive oven thermometer and test the heat of your oven. Many ovens are as much as 100° off, even new ones! If it is seriously off, have it calibrated by someone from a company that sells and fixes stoves and ovens. Otherwise, you may have to adjust the temperature up or down when you bake.
3 1/2 cups very warm potato cooking water
OR use warm water water plus 1/4 cup instant potato flakes
1 Tbs sweetener of choice (I use organic sugar
1 1/2 tsp. (1/2 Tbs.) dry active baking yeast
1/4 cup ground flax (optional) (use golden flax
1 Tbs sea salt (please DO NOT reduce this amount or leave out-- salt is important to regulate rising, as well as for taste)
2 Tbs oil (I use olive)
7 cups whole wheat flour (Canadian all-purpose whole wheat flour has a higher gluten content than US; use bread flour
OPTIONAL: raw sesame seeds to sprinkle on the bottom of the pan
NOTE: Why use potato water? Well, for one thing, it's a good use of water from cooking potatoes. But, seriously, the potato seems to help make 100% whole wheat bread nice and light-- I'm not sure why.
TO MAKE THE BREAD:
Dissolve the yeast in the potato water or water with potato flakes, along with the sweetener in a large bowl. When bubbly, mix with the remaining ingredients and then stir in the flour, using a Danish dough whisk
Cover the bowl with a disposable clear plastic shower cap (TIP: I get a pack of 8 of these for $1 at my local dollar store—very useful for covering bowls in the fridge, etc.), a snap-lid or plastic wrap (or place the whole bowl inside of a new small white bin-liner-bag and twist-tie it, leaving room for rising), and let rise AT LEAST until it rises and collapse (2-3 hours), but preferably for about 12 hours on the counter at normal room temperature. (I think the longer rise makes for better flavor and texture.)
You can place the dough in the pans right away, if you like, but it’s easier to handle when it’s cold, so you can place the covered bowl (let the gas out if you use a snap-lid) in the refrigerator for up to a week or so. (When I made this batch, it was only refrigerated for about 1 1/2 days.)
Either way, when you're ready to bake, shape the dough into 2 loaves (they will look a bit loose and sloppy, but not to worry!) and place in greased 8-8 1/2" x 4 1/2" loaf pans . (If you like, sprinkle the bottoms of the pan first with a few raw sesame seeds. My husband always does this and it lends a little extra something to the flavor!) Pat down on the top of the loaves with a wet hand to make the surface even.
Cover the loaves loosely (you can place the pans inside of a new small white bin-liner-bag and twist-tie it, leaving room for rising, or use the plastic shower caps) and let the COLD loaves rise about 2 hours, or the un-refrigerated dough rise for about 40 minutes, or to the top of the pans or slightly rounded over the tops of the pans.
Either way, when you're ready to bake, shape the dough into 2 loaves (they will look a bit loose and sloppy, but not to worry!) and place in greased 8-8 1/2" x 4 1/2" loaf pans
Cover the loaves loosely (you can place the pans inside of a new small white bin-liner-bag and twist-tie it, leaving room for rising, or use the plastic shower caps) and let the COLD loaves rise about 2 hours, or the un-refrigerated dough rise for about 40 minutes, or to the top of the pans or slightly rounded over the tops of the pans.
If you want to try using my husband's unique baking technique, which makes a moist bread with a nice crust, preheat oven to 480 degrees F with convection, 500 degrees F without convection. If you can’t be bothered changing the temperature during baking, just heat it to 375ºF!
Using my husband’s technique: just before baking, spray the loaves with water from a pump-sprayer (this helps you get a nice "oven-spring"). Place the loaves in the middle of the oven, and bake for 5 minutes. IMMEDIATELY LOWER HEAT TO 400 degrees F with convection, 410 degrees without (if you are baking 4 loaves at once, make the temperature 410 degrees F with convection, 425 degrees without), and bake for about 20-25 minutes, or until golden brown.
If you are using the usual baking technique: Bake at 375ºF for 30-40 minutes, or until golden-brown.
TIP: Either way, if your oven heat is uneven, switch the loaves around to different positions after the first 10 minutes at the lower temperature. Remove the loaves from pans immediately and cool on racks before slicing.
TIP If you like a shinier crust, rub the top of the loaves with a little vegan vegan butter.
Turn the loaves out onto racks to cool thoroughly (loosen the sides with a table knife, if necessary).
Enjoy!

Enjoy!

Saturday, January 15, 2011
LOVELY, COMFORTING, LOW-FAT BARLEY & SQUASH SOUP (WITH SOME OPTIONS)

I haven't been doing much in the way of interesting cooking lately, as life has been a bit helter-skelter due to my mother's illness. I have alot of things I want to experiment with, but it's just not going to happen right now, so I'm making quick or slow-cook
One thing good about this time is that I have to slow down on certain things, and do some reflection. This has led me to take care of some parts of me that have been neglected. I've started dancing with my dance sisters, Gillian and Bronwyn, once a week again (and vowed to do some by myself, too!)-- good for the spirit and the body. We're eating simply, which is what we need after the Christmas season. I've also started up a new cooking journal like I used to keep (read about those here), with a brand new red and black volume of blank lined pages-- you know, there's something satisfying about putting pen to paper sometimes, rather than using the computer. I'm enjoying sitting down and reading randomly from the old ones.

BRYANNA’S BARLEY AND WINTER SQUASH CHOWDER (WITH SOME OPTIONS)
Serves 6
This is a lovely, homey soup for fall and winter.
5 cups vegetarian broth-- my favorite is Better Than Bouillon Vegetable or No-Chicken vegan broth base
1 pound winter squash (such as butternut), peeled and seeded and cut into 3/4" cubes (If you have no squash, you can use peeled sweet potato.)
1/2 large onion, chopped
1 1/2 cups reconstituted Soy Curls® (See here for info; or use commercial or homemade vegan “chicken strips” or "shreds"; or slivers of smoked or baked tofu, or "chicken"-style seitan.
3/4 cup pearl barley
8 ounces red potato, diced (Instead of the potato, I sometimes use 1/4 cup of split red lentil.)
1/4 cup chopped celery leaves and tops
1 tablespoon vegan bacon bits (or use smoked salt or a little liquid smoke)
1 bay leaf
1/2 teaspoon dried thyme
1/2 teaspoon dried savory
1 1/2 to 2 cups non-dairy milk (I use creamy soy milk-- a non-sweet vegan creamer could also be used, OR any non-dairy milk blended smooth with some soft-medium or silken tofu to thicken.)
salt and freshly-ground black pepper to taste
Place the broth, onion, squash, chicken substitute or tofu, barley, potato, celery, soy bacon bits (or liquid smoke), bay leaf, thyme, and savory into a soup pot and bring to a boil. Turn down to low heat, cover and simmer for 30 minutes. Stir in the milk and taste for salt and pepper. Sprinkle each serving with chopped parsley, if you like. NOTE: If the soup is too thick, or gets too thick when cooled, just add a bit more broth until it is the consistency you like.
Nutrition Facts
Nutrition (per serving): 236.1 calories; 8% calories from fat; 2.2g total fat; 0.0mg cholesterol; 86.8mg sodium; 659.4mg potassium; 47.8g carbohydrates; 8.7g fiber; 4.1g sugar; 9.0g protein.
Enjoy!

Thursday, January 6, 2011
WHAT WE HAD FOR DINNER LAST NIGHT-- QUINOA TACO BOWL
 |
| It looks a bit messy, but it was delish! |
Printable Recipe
BRYANNA'S QUINOA TACO BOWL
Serves 3, more or less
Quinoa:
1/2 cup quinoa
1/2 cup red quinoa (if you don't have any, just use 1 cup regular quinoa in total)
2 cups water
a few pinches salt
Corn and Avocado Salsa:
1 cup thawed, frozen sweet corn kernels, drained
2 medium ripe tomatoes, chopped
1/2 cup chopped red onion
1 medium green pepper, trimmed and chopped
1-2 tablespoons chopped jalapeño peppers (can be pickled)
1 large ripe avocado, peeled and diced
1 tablespoon minced cilantro (or 1 teaspoon dried)
1 tablespoon lime juice
1 teaspoon ground cumin
1/2 teaspoon hot sauce
1/2 teaspoon salt
Spicy Soy Curls:3 cups reconstituted Soy Curls
about 1 tablespoon Bryanna's Taco Paste (recipe below)
a few sprays of oil
Garnish: Tofu Sour Cream (recipe here, or use a commercial version)
Mix the 2 types of quinoa together in a medium pot with the water and salt. Bring to a boil, then cover and turn down to a low simmer. Simmer for 20 minutes; turn the heat off and let stand about 5 minutes.
To make the Salsa, mix all of the ingredients together in a medium bowl. Refrigerate until serving time.

In a medium bowl, mix together the reconstituted Soy Curls with the Taco Paste, rubbing it into the Soy Curls with your fingers until evenly distributed. Heat a large nonstick skillet and spray it with a few squirts of oil. Add the Soy Curls and stir-fry for a few minutes just to heat and slightly brown.
Place a scoop of quinoa in each serving bowl, top with 1/3 of the Soy Curls and add a pile of the Salsa alongside. Drizzle Tofu Sour Cream over the Soy Curls and serve!
BRYANNA’S TACO PASTE
From my book "Soyfoods Cooking for a Positive Menopause ".
".
From my book "Soyfoods Cooking for a Positive Menopause
Mix in a food processor until smooth:
1/2 cup good-quality chile powder
7 tablespoons red wine vinegar
2 tablespoons dried red chile pepper flakes
4 vegetarian broth cubes , crumbled (or enough for 4 cups liquid), or 4 teaspoons veggie broth powder or paste
1 tablespoon olive or Chinese sesame oil
1 tablespoon flour (or 2 teaspoons rice flour)
1 tablespoon Marmite (or other yeast extract)
1 tablespoon water
1/2 tablespoon salt
6 cloves garlic, peeled
1/2 teaspoon EACH dried oregano and ground cumin
Store in a tightly-covered jar in the refrigerator.
All the best,

Subscribe to:
Posts (Atom)